Monday, 29 November 2010

From Script To Screen: How Does The Credit Sequence From Dexter Work?

Where did the creative ideas come from?
When watching the opening sequence from 'Dexter', it is quite easy to believe that the time taken to create this was minimal as the ideas gone into it are quite basic ones. However this is not the case according to Eric Anderson, the creative director of the film. He believes that all the ideas began with a simple phone call. 
After being approached by the show creators and discussing the character of Dexter, Eric began to jot down his initial ideas and as soon as he wrote down the title of the film, ideas came flooding to him, one in particular. He was amazed at how the letters formed in 'Dexter' were nearly identical right-side up as they are up-side down, much like 'Dexter' the character. He found that the character of 'Dexter' doesn't go through a massive transformation when he becomes the serial killer. He remains the exact same person, just comes across as there being something wrong with him. This for Eric was how he wanted the title to be portrayed (seen below), and he did so successfully.


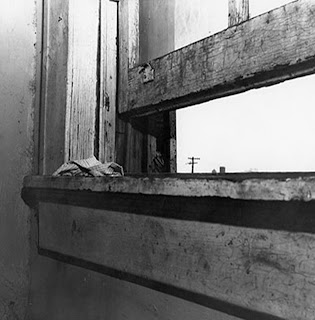
When hearing the words 'Mudane' and 'Six feet under', it brought back Eric's childhood memories, the days when he used to sit with his Grandfather and look through his 'True Detective Collection' magazines. It was when thinking about these magazines that he soon came to realise just how much he loved crime scene photography. He believed the crime scene photography created this feeling of overwhelming and sinister importance and from the process of photographic evidence comes an 'edgy antiaesthetic rawness'. This to him proved to be a very important piece into the making of this opening sequence.


Below is an image of crime scene photography. Although it may appear a 'normal' window, it is not until you find out that it is the same window from which Martin Luther King was shot, that makes it more sinister.


Following on from looking at crime scene photography, Eric came across two other artists that made him think more about the film. Looking at David Byrne's book, 'Strange Ritual' he found it was a book containing millions of images of  'nothing' and Mike Kelley was able to make the cutest most usually things incredibly naughty in the simplest of ways.
After studying these artists, he gathered a small creative team together and worked on all ideas they had, even if they pointed them in a 'loose direction'. Although they went through many ideas such as turning everything upside down like the title, they soon decided that perhaps they should go down the route of examining normal everyday things that could also be portrayed as horrific. It was at this point that one of Eric's assistants came up with the idea of a morning routine, where they would have the character of Dexter doing these normal things, but in a violent way to reflect him. When examining crime photography, they found it worked in the same way, in that the photograph came across as a normal photograph, but when uncovered for its true identity, they found it to be more horrific and sinister.
Below is an image of everyday situations, that have been made to look more horrific and sinister, just by the way they have been photographed.


A famous saying about this sequence by Eric Anderson
"Everything, no matter how mundane or beautiful, has an undercurrent of violence to it. It is just a matter of how closely you look. We are conditioned to see a blossoming flower as beautiful. But if you look closely, if you look differently you will see it more like an explosion. Here we see a mundane morning routine illustrated in extreme close-ups showing the underlying tension found in everyday situations making violence a part of everything."


In this opening sequence, Eric used noir lighting in the 'wides', as well as shallow depth of field shots. One reason for doing this was because the producing company was on a low budget. However Eric soon came to realise that having the noir lighting on the 'wides' helped to create this eerie atmosphere to the shots and made the shots more sinister, just as he had found the crime photography did. Supporting this was the use of shallow depth of field shots that made identifying the items used in the shots very difficult, but at the same time, made the sequence more mysterious and again created this eerie atmosphere. As well as this, these feature helped to disguise the jump cuts used in the sequence.
Below is an image from the sequence that shows both the noir lighting on the 'wides' and shallow depth of field shots used and by combining them together, helped to make this shot look more sinister.


When it came to choosing music for the sequence, Eric and his team found there were so many ideas to chose from that they struggled to know which lead to go with. It all started with a song called 'Miami Beach Rhumba' by Xavier Cugat which they found had a too 'jolly feel' to it and so they went down the path of Bernard Herman music which had a jazzy suspense feel to it. Eric found he was a big fan of Bernard Herman's piece and decided to go down this route of a 'psycho' theme tune to represent Dexter. However when he thought about it, he decided that it came across as being too 'psycho' feeling and this wasn't following the theme of normality. Neither was the track 'More Powah To Yah' by the band Xploding Plastix's. He found this had too much suspense to it and gave away the idea too much, this being that Dexter was a serial killer. In the end, he used a piece of music created by Rolfe Kent as this came across as a normal piece of music, but when combined with the sinister shots, made it a more eerie piece of music to reflect Dexter.
Below is the piece of music, 'Miami Beach Rhumba' that was first thought about for the opening sequence. 


Below is the piece of music, 'Psycho' that was another option for the music of the opening sequence.


This music was one of the final pieces to be considered for the opening sequence, but in the end, came across as being too sinister.


This was the final piece used to create the opening sequence of Dexter.

Friday, 26 November 2010

Analysis Of The Opening Of Juno

Although we had used a wide range of resources to research the opening sequences of films, we decided that we needed to focus more closely on the specialised features used and to do this, we studied the opening sequence of the film 'Juno', one of Jason Reitman films. From watching this clip, we then had to see how the different features found in an opening sequence helped to establish the character, narrative and genre.

As soon as the sequence starts, we are given this clear image of the character 'Juno' from the mise en scene used. From looking at this part of the sequence, we are able to see that she is wearing your basic casual clothing, such as jeans, hoodie, trainers etc and it connotes this message to the audience that the character of Juno is a typical teenager, who perhaps feels most comfortable in these clothes. However at this point, we believe Juno to be in a state of 'be wilderness' as the way she is waking and her body language suggests she doesn't feel comfortable with this journey she is taking as we first thought. Below shows an image of this part of the opening sequence where we first establish the character of Juno.


After this above shot, the opening sequence changes from a 'real life' sequence into an 'animation' sequence, with Juno being portrayed as different to the backgrounds of the sequence. This effect connotes a message across to the audience that this is how Juno is feeling right now and the 'animation' effect is how she portrays her surroundings at this point. From this, we also believe that she is being shown different to the background as she is feeling isolated and vulnerable on this journey she is taking. It helps the audience establish more about her as a character and at this point, we as the audience feel sorry for her as she comes across as this confused, vulnerable and isolated girl who wants to be able to fit into her surroundings, yet is failing to do so. Below shows the change of sequence from a 'real life' sequence to an 'animation' sequence.


This part of this sequence with her journey helps us to establish the genre of this film. This idea of her being a confused, vulnerable and isolated girl comes as a contrast to the surroundings she is in. This journey she is taking suggests it is one where she is travelling from a child to an adult, but the surroundings consist mainly of an adult world. Perhaps this is what Juno wants to forget with it being faded out. Perhaps she is having to grow up too quick than planned and she would rather keep her childhood. Every once in a while, items related to teenagers appear in the background such as an acoustic guitar and a retro TV, both reinforcing the teenager's interests and also reminding the audience of her complicated journey. As well as this, the music used contains lyrics of love related words and this connotes to us that perhaps she is in search of love on her journey too. When the lyrics 'If i was a tree growing tall and green...be my leaves' is used, it shows how two objects so similar have to go together and this message is then portrayed across to how Juno is feeling. It helps set up the character of Juno as both innocent and pensive.
 Another way we get to see how Juno is feeling is when we as the audience are positioned over Juno on her journey. As we are looking down at Juno, she looks up at us and at the same time, leaves begin to fall above her head. The way Juno looks up at the camera suggests again this vulnerability and insecurity of her and the way the leaves are falling, mimics this idea of her life falling away and this can be related back to this journey of hers and how the audience believe her to be growing up too quick.
The images below show how we as the audience are following Juno's journey.


The image below shows how the high positioning of the camera and falling of leaves connotes this message of Juno feeling vulnerable and insecure and how the leaves are reflecting her life falling away.


When the audience are introduced to the title animations, this idea of Juno having to grow up quickly is portrayed in these titles. They have this funky, colourful image to them and their appearance seems to reflect the art work of a child. This again relates back to establishing the character and genre of the opening sequence.


The music used in this opening sequence comes across as quite a happy and upbeat piece of music and suggests that the rest of the film will be a sweet, funny/sad one with an indie spirit. The ironic thing is the creator of the piece is Barry Louis Polisar and he used to be a kids' balladeer. This again seems to help establish the character of Juno, her feelings and the genre.
Below is the piece of music used in this opening sequence.


The image below shows Juno returning back to the real world and this to the audience seems to reflect her state of mind, that being she has to return back to the real world to continue with her journey. From this sequence we also establish the narrative. As the audience aren't actually aware of Juno's journey, it opens up to there being many questions wanting to be asked. This is where we establish that perhaps the narrative will be about finding out why and how she is on this journey.

Monday, 22 November 2010

Key Conventions

To find out what the key conventions of films were, I undertook some research into what over films used. The following films are the ones I looked at:
*Shifty
*Kick-Ass
*London To Brighton
*Brick
*In Search Of A Midnight Kiss
*Trainspotting


Below is a spider diagram to show my findings:


While doing my research, I found that there were many points to an opening sequence. One feature that appeared in all the films I watched was an introduction to who the production company was. By showing this in the opening sequence, the audience know from the beginning who produced this film and perhaps know what to expect if they are familiar with the producers. Below is an example of this feature from the film 'Kick-Ass'.
Another feature that was used in an opening sequence was an introduction to the characters in the film. By doing this, the audience have a better understanding of who is who and develop a connection between them and the character. Below is an example of this feature from the film 'Trainspotting'.
For many films, the opening sequence can contain an atmosphere that sets the mood of the opening part of the film and by doing this, the audience get a feeling of what the beginning of the film is about. This is visible in the opening sequence of 'London To Brighton' shown below. It connotes this message across that the mood of this person is somewhat scared and terrified.
Another feature found in some opening sequences of films is this idea of curiosity. Many films will have sequences that show action shots or silent shots and by doing this, it makes the audience asks questions about the film such as 'Why is that happening?', 'Who is that character?' This is shown in the film 'Brick' where there is a shot of a woman lying dead and a man starring at her dead body. It sets the audience's mind racing as to why and how this shot is how it is. Below is an image from this film of this feature.
A feature that can be found in a lot of opening sequences is where the film states what the time and place is of the opening shot. This is done to help the audience stay on track of where the storyline is and make them have a better understanding of the film and its characters. Below is an example of this from the film 'Kick-Ass'.

Wednesday, 17 November 2010

Main Task

The main task is to create the titles and opening of a new fiction film, to last a maximum of two minutes. My key deadlines are as follows:


*Research Deadline - 26/11/10
*Photo-storyboard Deadline - 03/12/10
*Filming Deadline - 07/01/11
*Production Deadline - 28/01/11
*Evaluation Deadline - 11/02/11

Friday, 15 October 2010

Targets

*Remember to use a tripod when filming again.
*Remember to use a clear 30 degree angle to avoid jump cuts.
*Try to be more precise when joining clips together

Thursday, 14 October 2010

Evaluation

Continuity Editing
Continuity Editing is where you try to make the work of the editor invisible as much as possible to help create a natural flow and let the people who are watching the TV show be immersed in the programme. It is used to grab the audience's attentions and keep them gripped with the storyline, without them realising where it has been edited. The key rules of continuity editing are:
*Establishing shot
*Shot reverse shot
*Eyeline match
*The 180 degree rule (or 'Axis of action')
*The 30 degree rule
*Cutting on action


Establishing Shot
This is a shot that establishes the scene, often used to give the viewer information of where the scene is set.


Shot Reverse Shot
This is a shot that shows one angle of a shot followed immediately by its opposite angle.


Eyeline Match
This is a type of edit which cuts from one character to what that character has been looking at.


180 Degree Rule
This is where two characters are facing each other and they must never appear in the same half of the frame. If any editing has been done, you always have to make sure they appear in that same frame as before, otherwise the audience will be aware that editing has taken place.


30 Degree Rule
This is when you change the angle of the camera to film the same event or object, making sure the camera has moved at least 30 degrees to avoid the effect of a jump cut.


Cutting On Action Shot
This is a shot that emphasises continuity of space and time by matching the action of the ongoing shot with the action continuing in another shot.


Digital SLR Camera
I had to use a digital SLR camera to film our task and to begin with I found it hard to work. I couldn't understand why it wasn't taking a photograph and then I found that I had left the safety cap on the front. Once I had removed this, I found the camera very easy to use as I set the mode to auto then everything was ready for me and labelled well. In the end, it only took a few minutes to do. When moving my pictures onto the computer, I inserted the SD memory card and copied them across. Once I had done this, I inserted them into my blank storyboard document in PhotoShop and wrote annotations to help me with filming.


Organising Filming
On the whole, I believe that as a group we were very organised as we had everything planned before we began filming. By having a storyboard already complete, it gave us a better idea of what we had to do to get this filming correct.


Digital Video Cameras
When starting to film our task, we encountered a problem that the video camera wouldn't fit correctly onto the tripod. Because of this we had to use hand held filming, which to be fair didn't turn out too bad. I was confident using the video camera as I had used one before, and these cameras have generally the same features. To upload our footage from the DV camera to the 'Adobe OnLocation' software, we used a USB cable and this was done very quickly and easily. Once our video was uploaded, we had to choose the clips we wanted to use and copy them from the video into this software for us to then edit them. This was done without any problems.


This shows the 'Adobe OnLocation' software we used to select the clips we wanted to edit.


Editing Process
The program we used for editing was called 'Adobe Premiere Pro'. I had never used this program before so thought it would be quite difficult to use. However, after getting started and doing the basic editing, I found it to be very easy, and it didn't take long to complete the editing. We had to use the cutting tool to crop the clips and because you could stretch the timeline, you were able to combine the different clips together so that there were no jump cuts. I found this tool very useful as you could see clearly what you were doing and it was as simple as uploading your clips, dragging them onto the timeline and cropping them to fit together. Overall, I believe the outcome was very successful as the video seemed to combine together well and when playing the final piece it is very hard to see where we joined the different clips together.

This shows the 'Adobe Premiere Pro' software we used to edit our film.


Youtube
To get our video on to my blog, we had to set up an account in youtube and then upload the video. From here, I had to copy the embedding code to my blog and place it in the 'edit HTML' page and once I had done this the video was uploaded successfully. One point I have learnt from this is when uploading a video make sure it is set to 'public' view otherwise the people looking at your blog won't be able to look at your video if set to 'private'. 


This shows our video on youtube, with the embedded code selected.


Blogger
On the whole, I found Blogger to be a very good website to use. Everything is set out in a logical way so it was quite easy for me to find my way around the site. A good feature was that it allows you to save a draft post before publishing, meaning you can go back to it whenever you want.
My only criticism was that when it came to uploading our video, it didn't work from just copying the embedding code into the main blogging document, so we had to copy it into the HTML page. By doing this, it worked and the video was a very good standard.


Wednesday, 6 October 2010

Post-Production

When we began the editing process, we found the software quite difficult to use. However, after having a play around with certain features, we got to grips with it and had some real fun. Cutting certain pieces out of the clips we found to be pretty straight forward and with the extended time line, we were able to paste clips together to make them more continuous. :)


Below is our finished video for our preliminary task. Hope you like it :)


Production

On the whole, filming went very well for our group. The people we cast for our characters played them very well and they managed to keep serious for the whole production!


The only problems we encountered was when we played the video back, we found that the character opening the door opened it with his wrong hand and so we had to film that part again. Another problem was that we forgot to include a 'cut in' shot and so we took a close up shot of the character's hand and added it in. Apart from those slight hiccups, filming was really good fun and couldn't have gone better :)

Pre-Production Task

Before we started filming our preliminary task, we created a storyboard to show the sequence of our short video. We took several photos of the different shots that we would be doing in our final piece and added a few notes about what the camera angle would be, the type of shot we would be using, the script and the different locations for the cast.


The reason we did this was to give us a clear understanding in our heads of what the surroundings would look like, where the camera was going to be positioned at each shot and how long each clip was going to be. We found that this worked well and when it came to creating our video, we had better idea of where to positioned people and the different camera shots. :)


Friday, 24 September 2010

Continuity Editing

Continuity Editing is where you try to make the work of the editor invisible as much as possible to help create this natural flow and let the people who are watching the TV show be immersed in the programme. It is used to grab the audience's attentions and keep them gripped with storyline, without them realising where it has been edited.
The central elements of continuity editing are:
*Establishing shot
*Shot reverse shot
*Eyeline match
*The 180 degree rule (or 'Axis of action')
*The 30 degree rule
*Cutting on action

Wednesday, 22 September 2010

Preliminary Task - Video Production

For my preliminary task, I have to create a video that involves filming and editing a character opening a door, crossing a room and sitting down in a chair opposite another character, with whom they then exchange a few words. 
Doing this should show match on action, shot/reverse shot and the 180-degree rule. I also have to include a cutaway and 'cut in'. I should make sure that I create a smooth running video, where the audience aren't aware of where cuts have been made. (:

Preliminary Task - Video Production

Hey People :)
Welcome to my Blog :)!! My name is Amelia Smith and this is my preliminary task for Media Studies. Hope you like it ;)